|
TECHY SUPPORT BLOG
Thursday, 16 January 2020
How to Fix Black Screen On Windows 10
Windows 10 is the best operating system, but some fault so we are showing you how to solve the black screen Windows 10 problem. Windows 10 is a worldwide used operating system all over the globe and is designed from the glebe up to be user-friendly and simple to get along with. But, this does not mean it is good. There are many issues in Windows 10 and we are going to be seeing, and solve the issues Black screen of death on windows 10. If you give the speed of windows 10 then look no ahead than our fast guide, and your self protect online you first sure find VPN and protect your self. In the installation time how to fix Black screen windows 10 In the installation time if you may be going to a black screen of Windows 10, you depending on your hardware, that means installation is going on in the background. In these steps, the first step is your computer in this situation to leave the black screen for up to 6 hours because your computer is slow. In your device, your device hardware is much better that work will be done fast. If anything does not change your computer, you just need to force shut down, hold power button just 10 seconds. Unplug every connecting device, after then try to reboot your computer up again and restart the installation procedure. If you face the problem in the current time you try to install windows with the help of bootable USB drive. 
Check out monitor's connections It is not comfortable just like sounds silly, but a very simple solution is a good one. Make confirm and you check the all connections monitor and PC, and monitor's electric cable. You must check your monitor is on it is not displaying stand light, it is the problem with power cable and issue with the monitor itself. Power light is on but you can not find a signal from your computer, then after you try another cable or another connection. Force your display to start It is maybe possible windows 10 is not detecting or found your display. Then you use the keyboard to press the Windows key + Ctrl + Shift + B its forcible wake up your display. find the solution of Black screen windows 10 issue boot your computer safe mode. Booting your computer safe mode start windows 10 in the boot mode only essential programs and apps running, then it works and you find the problem, what is the problem your computer. Next, press the shift key, and hit the power button at the right side of the bottom screen, after that choose restart. If you not seeing anything your screen and your screen is black, next to the press the power button and reboot your computer again. Perform the next three-time it will perform the Windows 10 automatic repair function. follow the steps is given below. - Hit the advanced startup menu, after that click Troubleshoot.
- Hit advanced Options.
- Choose Startup Settings.
- Hit the Restart tab.
- In the startup settings, press F5 or 5 to go Safe mode with Networking.
Reinstall your Video driver If the problem with your screen then disturbs your video driver trouble, so better idea to attempt reinstalling. - Press Windows key + X and select Device Manager.
- Choose display adapters, right-click display adapter and choose Uninstall.
- Click ok to confirm, after than uninstall the application.
Your Computer will automatically reinstall the display driver either it boots up again If find any issue it was fixed. 
If you want to know about the other way, Then go to our website and please read the full article. If you fail to do it then you can contact us a technical available 24/4 in customer help. In the help of "Black screen windows 10".
Wednesday, 15 January 2020
How to Fix YouTube Not Working on ROKU
How to solve "Youtube Not working on Roku" see details given below: Fast View: Roku also provide full access of youtube all video without any disturbance and login, and if you do not require create or sign in to a YouTube, However, you login into Roku and linking your YouTube account, then after your viewing experience is much better. You can also you full access and you view your playlists, watch history, and see your subscriptions list. If you Signed in or not, Roku channel will give recommendations under the series of Music, News, Gaming and Movies. But sometimes you facing Youtube Not working on Roku. If you visite a browser and find or search to be frustrating on the Roku application, then after you pull out your device or Smartphone, tablet and try to use the 'Send to TV' function. You find a small casting icon showing every video on your smart device, after your YouTube account linking the Roku. you just need to click in this icon and video will quick play on your TV through Roku. Your Smartphone will convert a remote and control For your Roku Device YouTube Channel. Experts find the problem and saying in these types of issue are created bad connectivity of internet problem with your smart TV or Box it is automatically some time goes to black and your YouTube channel is freezing while playing the video. If you find the solution of these types of issue flow the given steps below. 
Your application is freezing in the video playing time, then you first disconnect power on your Roku Box. In this, your TV will turn off. Retry after 5 to 10 seconds and you try to turn on and replug all power connection. And your device will be starting rebooting now. In this process can be solved many issues in a single process. many time you start rebooting your device and it's working properly. In these types of issue is showing sometimes your Roku version or a low price device and not powerful equipment. The more chance of likely to be run into the problem and bug in the device. so you have to remember the steps of the solution then you have Roku stick and some kind of low-cost model. You check and a good connectivity internet connection is available. That means your Wi-Fi signal is excellent rang in the term of the signal. Go to setting and select the network section through the Roku remote. Click OK it will take a few secs to check your connection. After that everything is load properly once, then you can check your network signal in the right bottom of the screen. Without any interruption load YouTube video and play properly. poor network signal is, not proper streaming high-quality videos. 
If you want to know about the other way, Then go to our website and please read the full article. If you fail to do it then you can contact us a technical available 24/4 in customer help. In the help of Youtube Not working on Roku.
Tuesday, 7 January 2020
How to fix Windows Update Problems
In this troubleshooting, we discuss some methods to solve to the end-user to Windows Update Problems and update the windows or installing updates or solve the windows update errors or another issue related to windows update. In many Windows 10 PC User or owners are look over different problems during the time of installation of a new critical windows 10 update and get the update installation error "Windows won't update" or "Windows update stuck", windows does not support to solve the problem. (I do not understand in this updating a system the work simply should be taken so the time is taken and often not completed). sadly, there are more ways to solve this issue maybe the time of updating and updating windows 10, so we are writing here how to solve Windows Update Problems? in this guide are including some the methods that I have used from time to time to settle the similar issue. 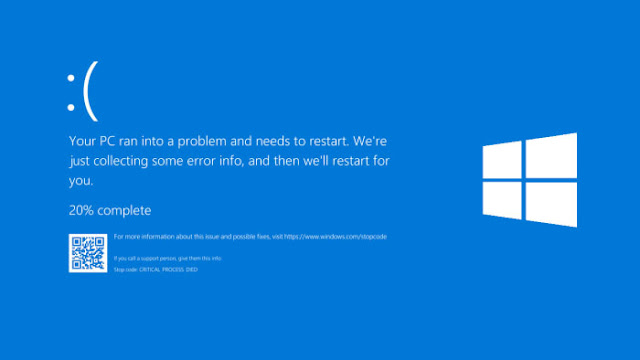
In these ways to start troubleshooting ways and fixed the issue to Windows 10 update and upgrading problems: Windows 10 Upgrade Installation is freezes Windows installation Error: Windows Installation Has Failed. Properly update to Windows 10 unsuccessful to install. Windows 10 update interrupts to install. Windows 10 is not able to completely update the installation. Windows 10 is not fetching or download updates. In this ways is Solve Windows 10 Update or Upgrade Issues: Note: You follow the instruction to before solve the issue below to troubleshoot Windows 10 Upgrade/Update, continue and apply the succeeding and go next to attempt to update Windows 10 again. Step 1. Conform first you have login in with an account and enter privileges. Step 2. Ensure that your Time, Date and Regional setting are right. Step 3. In your device encryption is on or enable first, you decrypt the C drive, and next to proceed to install the update. Step 4. Go to Windows Service and open it and select start Automatically at Windows Startup. Windows Modules Installer Background Intelligent Transfer Service Step 5. You must conform and disconnect all the secondary devices you do not need as like USB Driver, Printer, USB wi-fi Network Card, SD Cards, USB Wireless Mouse etc. Step 6. After that, you must conform Developer mode is off. 1. Then after select Settings Go to Update next Security next for developers Sideload applications and select Yes to confirm. 2. Again Go to Settings > Application > Manage optional features > Windows Developer Mode > Click Uninstall. 3. After that, you Restart your computer and then attempt the update. Step 7. First, confirm your computer is also free from malware and viruses. To manage a task this task you can use this check you Virus Scan and Removal Guide to examine the remove malware or/and virus Application that may be scanning on your PC. Step 8. Go to Control Panel and select Power option and set the computer select Sleep to Never and disable the Fast Startup. Step 9. you must be sure your disc space is free at least 30GB Space is available. Step 10. You remove all useless files and Cleanup your Disk Space. Step 11. You must conform and download and install the updated version of stack update, for window 10 version and architecture 32 or 64 bit. you want to check installed windows 10 version, go to Start Setting System About. Step 12. Update important device drivers. Go to your hardware's vendor Support and check download and install the updated drivers for the VGA. Also, occasional you need sometimes uninstall and update your VGA driver and system BIOS. Step 13. You disable all temporary security scan software also all Non-Microsoft security software as like antivirus, firewall, anti-malware, etc, because to avoid similarity issues with the brand new windows updates. Step 14. You confirm and disable setting the BIOS security Boot. If you want to know about the other way, Then go to our website and please read the full article. If you fail to do it then you can contact us a technical available 24/4 in customer help. In the help of Windows Update Problems. 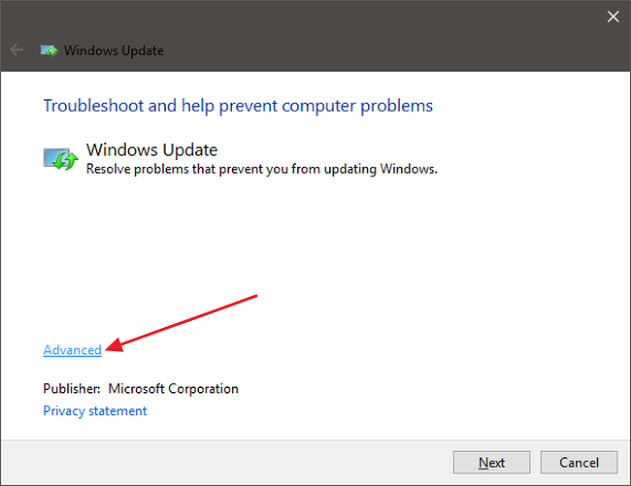
Saturday, 4 January 2020
How to fix kaspersky not working issue
Know-How to Fix Your Kaspersky Antivirus if Stopped Working? In day by day increased database cybercrime and threat to your data and you fill helpless and prone to risk. In this think, a company introduced anti-malware software to provide the security to your database and virus and another third side that may be injuries. The title of this software is Kaspersky antivirus security. In this application developed by America and has few integrated processes that provide the security of the computer with a third party and any other malware. After that introduced, it is favourite of one demand antivirus application that for users. In this application is the user-friendly interface as like smart functioning and simple commands interfaces. Kaspersky Not Working is not a big issue. And users preferred to this software to protect all kinds of their important and personal data from infections. Kaspersky Antivirus Support and protect and recover all kinds of loss of all-important fills recover and scan virus and other malware. 
Important discuss for Kaspersky not working In this application, a user can be needed to log in the user name and password will be required and remain personal security Id. It Is disappointing Kaspersky Not Working. Let us go to study what is a reason and find its solution. - Its may be possible your antivirus software is not updated.
- It's maybe your subscription need to renew. it may be expired.
- It's maybe, Your windows must need to update.
- Otherwise, you have an issue in your internet connection.
Then you do not know to Kaspersky antivirus not working certainly you find the solution and fix it. If you are facing some issue to finding its solution and try to solve, then you do not need to panic. Here you find the solution just need to further read. - You need to check your antivirus application Kaspersky Software need to update the latest version. You use the old version of the software might be a reason to not work.
- Otherwise, you must confirm and check your Internet connection to work properly or not working.
You must be sure your date and time are right. Starting the solving the problem or start troubleshooting, you must confirm the time and date is correct because Kaspersky is depended on your computer date and time to download the application. Steps of repair Kaspersky Total Security If you want to reset and restore the default settings in anti-virus Kaspersky Total Security, Go to Setting and then open the application's in main windows, after that hit Manage Setting and choose the option Restore Setting on the Drop Down Menu. After that new windows appear and open the restore Settings wizard and you will easily reset your application configuration. 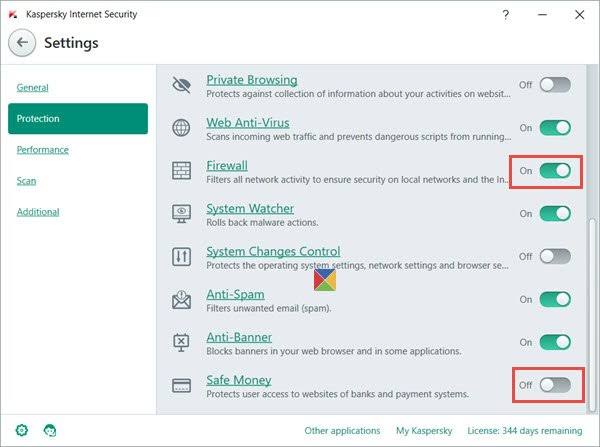
If you find the Kaspersky is not working, Kaspersky not start, or not working correctly. in this way, you need to repair Kaspersky Total Security. Please visit our website to read the full article, If you need any further assistance, you can contact us a technical is available 24/7. In the help of Kaspersky Not Working.
Friday, 3 January 2020
How to fix mac sound not working
If you found the Mac Sound not working. Don't worry about this please follow this given instruction to solve it easily. Macs users are found these sound and audio problem is common. If you are coming audio bugs after upgrading your OS (operating system) after that you install a new sound device or you change between Applications. Simply, most of finding these type of problems are solutions are available it is very simple you press the un-mute icon or balance your audio settings. You flow the given some steps to fix it easily and you got your Mac sound working correctly again. Firstly, You check your Volume and hardware components. You make conform and see your computer sound is not muted. It may find exact, but you easier find and you save wasted of hours of time. you just need to click the mute and unmuted button and test it you increase and decrease the sound volume. You have plugin external audio device or headphones it is a good time to check out they have blown out. Select the Right Sound Device If you try an external audio device or headphones attached and you are not hearing anything. This is common bugs in the Mac. You did not find the exact reason, occasionally your Macs you select the wrong output sound device when the time of installation or attache a new one. Flow these steps to fix it. 1. Firstly you go to the Apple menu and select System Preferences Sound Output. 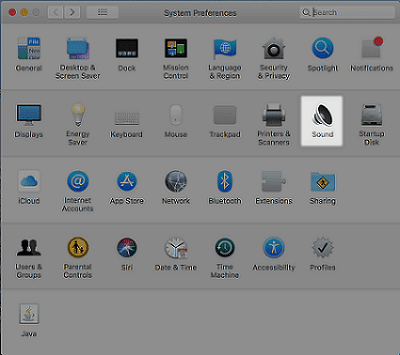
2. Choose the Right Output Device for Your Sound. 3. In case of you, already selected an audio device, then you selecting a different sound device and after that, you re-selecting the one you find the solution to the problem. It is the right one, after that, you can try to reconnecting and unplugging your sound devices. you sure to uncheck the mute option and tune your output sound devices. This problem does not solve, In this problem is one of Mac's audio interfaces, Maybe these results are including some error, hidden or prevented sound. You need to reset the low-level Mac audio API, Genuine Audio commonly fixed these problems. 1. Hit on the Spotlight search icon and find for "Terminal." 2. Go to Terminal and type: 3. You just need the reset the API, After that you sure to test your sound is working correctly. Occasionally the resolution to the sound problem is as simple as turning off your Mac and turning it on next. After that, you not hearing the sound of your sound quality is poor, you just need to completely shut down your Mac. As different a restart, Your computer is Shut Down the RAM processes completely clears, You do solve the common slack sound issues. 
You Just Restarting or zapping the Non-volatile random-access memory (NVRAM) can potentially resolve the sound issues. 1. Completely Shut Down Mac. 2. Next to Switch on your Mac turn on and press hold the Power Button. 3. Press and hold command + option + P + R until your Mac Restart. If you are attempt this option, remember that zapping your PRAM/NVRAM will comeback your startup disc, audio preferences and time zone to go to the default settings. If you have to try to cover the solution to the problem. and you not able to solve problems with sound. If you failed to solve "sound not working on mac" please contact us for further assistance.
Wednesday, 25 December 2019
How to Uninstall Microsoft Office 365?
If you success full install Microsoft Office 365 in your computer, If you uninstall Microsoft Office 365 there is a lot of reason. Maybe, If you are an attempt to Set free up an excess of Office 365 to any other computer or device, perhaps not working properly and you are attempting to reinstall the software to correct any issues, you only do not equally product and then you try to run down to older or previous version or you try to uninstall it always. I don't know what is the reason, there are some ways to uninstall Microsoft Office 365 from your device or computer. Method 1: Uninstall Office 365 from Windows 10 through Settings. Flow these steps to uninstall Microsoft Office from Windows 10 through Setting given below. 2. Select on Applications and Features. 3. chose the Microsoft Office 365 installation, or chose an option suite of a name like Microsoft Office Home, or Microsoft Office 365 and Student 2019. 4. Hit the Uninstall Tab. 5. Hit the Uninstall Tab again. 6. After that, you complete this task with continuing on-screen directions. you complete in these steps, then your device or computer the suite of Office application will not be available. In another option, On older version of the Operating System (OS), Go to Control Panel and select Program and Features select Uninstall Microsoft Office 365 or suite. How to Uninstall Microsoft Office 365 completely using the easy fix tool. You will be using an easy fix tool and fastly you speedily uninstall Microsoft Office 365, Office 2013, or Office 2016 from your computer in this facilities provided by Microsoft. Flow these steps to 'Uninstall Microsoft Office 365' using to tool: 1. Firstly you Download Office easy fix tool through Microsoft. 2. After that, you launch the tool double click the file. 4. Select Yes to perfectly uninstall the suite of Microsoft Office apps from your computer. Microsoft Office should be permanently removed from your computer, after that, you can flow on reinstalling Microsoft Office 365 from your Microsoft Office Online account or step by step manually install Microsoft Office 2016. You can not uninstall single or individual applications anymore according to worth pointing. As like Exel or Word, Using Microsoft Office 365. and how to we do remove an individual application. It does easily than you buying the standard version of the suite. You flow these steps to easily uninstall Office from your Mac Computers such as Exel, Word, PowerPoint, Outlook and OneNote. Firstly you Signed in as admin on your Mac using user name and password to complete these steps. Remove Office from your Mac apps. 1. Firstly Open Finder select applications. 2. Command +click to chose all of the Office for Mac apps. 3. Ctrl+hit apps you select and hit Move to Trans. 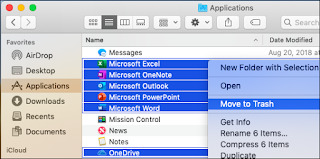
Go to Library folder and delete files from your user 1. Go to Finder, press Command +shift+g. 2. Appear in these windows, enter ~/Library after hit Go. 3. Go to the Containers folder and ctrl+click here move all folders to Trans. 4. After that go back to Library folder use the back arrow and open Group Containers. Ctrl+click move all folder to Trash. Delete from Dock and restart 1. If you put Select each one Office apps your Dock and ctrl + click Option Delete from Dock. 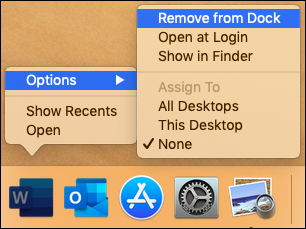
2. After that, you restart your Mac to permanent Uninstall. If you failed to How to Uninstall Microsoft Office 365? please contact us for further assistance.
Saturday, 21 December 2019
How to Create an apple id?
If you use Apple online services you required an Apple ID, In this Apple ID you use Mac, iPad or iPhone. it's very simple. How to create an Apple ID? 
You can not access all services of Apple services and products without the help of an Apple ID. Happily, it is very simple to create one. In this article, we discuss here how to create an Apple ID for anyone or a child, as sensible with set up strong security and attach Family Sharing group. For more details on Apple ID account setup, read How to change an Apple ID and How to use an Apple ID account. Firstly go to Apple website and Visiting Apple's ID part then after clicking and Create An Apple ID. https://appleid.apple.com use in this link and flow the instruction and easily creating Apple IDs on the web portal and manage it. It is not required Apple ID to link Apple product. If anyone allowing to create an Apple Account or you are windows user or Linux user. You get a free iCloud account to limited access in you use to online versions of Keynote, Page, Numbers and your have 1GB of Free iCloud storage to boot. But, aside from using this storage space from the foregoing web-based apps, you are not able to access another way for example, through the iCloud Windows for Windows app - need first you link the Apple ID to an iOS or Mac device by signing. Limited accessing online iWork tools. Without you do not link your Apple ID to Mac or iOS device. Then you want full access iWork tools to link it. 
you creating for Apple Id. have provided an email address for your username. But you know this is not existing email account that's given by Apple, and it is not truly previously used for an Apple ID. Do not provide wrong details because a verification mail will be sent to your email address, and you open first you verify the given link in your email address after that you able to log in Apple ID opened for business. Next, in case of your application in down in future, you have required another email address for secure your account for resetting your password. In this email address, less use or rarely and this way use Apple ID. You could give the email address of your family member, as well spouse. Verify this email address using a verification link. Provide the date of birth to create on Apple ID, fill in all details and security questions, and provide your mailing address. Do not fill any false information because Apple will be using your all the details again conformation. Correct ways, you Provide the correct country and enter details seeing that Apple runs various programs separately Movie, Music and App Stores for apart region. If you live in Antigua but you provide Birmingham then it will difficult when you will provide details of credit card details to purchases. your billing address is different. you will be limited to selling through Birmingham's local iTunes and Apps Stores. If you failed to create new Apple ID in this procedure flowing the guide. please contact us for further assistance for Change Apple ID.
How to Create an apple id?
If you use Apple online services you required an Apple ID, In this Apple ID you use Mac, iPad or iPhone. it's very simple. How to create an Apple ID?
You can not access all services of Apple services and products without the help of an Apple ID. Happily, it is very simple to create one. In this article, we discuss here how to create an Apple ID for anyone or a child, as sensible with set up strong security and attach Family Sharing group. For more details on Apple ID account setup, read How to change an Apple ID and How to use an Apple ID account. Firstly go to Apple website and Visiting Apple's ID part then after clicking and Create An Apple ID. https://appleid.apple.com use in this link and flow the instruction and easily creating Apple IDs on the web portal and manage it. It is not required Apple ID to link Apple product. If anyone allowing to create an Apple Account or you are windows user or Linux user. You get a free iCloud account to limited access in you use to online versions of Keynote, Page, Numbers and your have 1GB of Free iCloud storage to boot. But, aside from using this storage space from the foregoing web-based apps, you are not able to access another way for example, through the iCloud Windows for Windows app - need first you link the Apple ID to an iOS or Mac device by signing. Limited accessing online iWork tools. Without you do not link your Apple ID to Mac or iOS device. Then you want full access iWork tools to link it.
you creating for Apple Id. have provided an email address for your username. But you know this is not existing email account that's given by Apple, and it is not truly previously used for an Apple ID. Do not provide wrong details because a verification mail will be sent to your email address, and you open first you verify the given link in your email address after that you able to log in Apple ID opened for business. Next, in case of your application in down in future, you have required another email address for secure your account for resetting your password. In this email address, less use or rarely and this way use Apple ID. You could give the email address of your family member, as well spouse. Verify this email address using a verification link. Provide the date of birth to create on Apple ID, fill in all details and security questions, and provide your mailing address. Do not fill any false information because Apple will be using your all the details again conformation. Correct ways, you Provide the correct country and enter details seeing that Apple runs various programs separately Movie, Music and App Stores for apart region. If you live in Antigua but you provide Birmingham then it will difficult when you will provide details of credit card details to purchases. your billing address is different. you will be limited to selling through Birmingham's local iTunes and Apps Stores. If you failed to create new Apple ID in this procedure flowing the guide. please contact us for further assistance for Change Apple ID.
Thursday, 12 December 2019
Dell Support Assist not working
If you know dell Support Assist Monitor and check your computer hardware health. Other software as well as your computer. and this tool is most important and useful your Dell computers, but Some Dell User can encounter ‘Dell Support Assist not working‘. If your Device is facing this types of issue you read this article and fix it easily. You can be completing all Step you will be able to solve this issue in easily in your own. How to fix it Dell Support Assist not working Error. If you want to solve these types of issue flow this given some step to fixes troubleshoots this type of particular error in your device.  Step 1: Delete all the files and Uninstall Support Center If you want to Settle in these types of fault, firstly Unistal the Dell Support Center from your computer or device. Otherwise, delete all files and folder in your device related to Dell Support Assist or Dell Support Center. Follow Some step to solving this Issue given in these perfect action: 1. Firstly you use key bord and hold ‘windows logo’ key + ‘R’ and launch the Run Dialogue box. 2. After that opened Run dialogue box, and type “appwiz.cpl” and click or hit Enter and another window are appear then open the Programs and Features option. 3. Then after you go to the Dell Support Center and Dell Support Assist. 4. First done, Dell Support Center or Dell Support Assist right-click and do this. 5. At the Moment, Select the option. 6. You steel waits until your computer or device finishes the removing procedure of Dell Support Assist or Dell Support Center. 7. First done, hold the Windows logo key as well as the E button to reopen the Windows Explorer and File Explorer. 8. See the right side of windows, and tap to My Computer section or PC. 9. Now, You go to C Program files and remove or delete it the name of Dell Support Assist and Dell Support Center. 10. Then after, Go to C drive and find location name C:\Users\*YOUR USERNAME*\AppData\Local\Temp and removing all files and folder Temp. 11. After done, In C drive go to the section with is C:\Users\*YOUR USERNAME*\AppData\Roaming and remove PCDR folder. Then after once done, Restart your Windows device. then after you will be able to solve this issue on your own. Step 2: Do Restore your Device Or Computer 1. If you can able and solve this issue firstly perform a system restore process in your dell device in another way to resolve this particular error. in this instance, Flow this given step in below: 2. Firstly, find it Cortana section the Windows 10 Device. Find it, and tap on the Create a restore point section. 3. Done it, you easily see the system properties your computer or devices will begin containing and appearing the settings in the restore point. In this computer window, Next, you go to Protection Setting and Enabled it in the Local Disk C (Computer Drive). 4. If you see disable notice it, after that, you have to choose that disk as fine and tap Configure tab and enable it. 5. Then after, You have to full access to allocate the maximum disk space and allow it System Protection. 6. you have set it as per your requirement. 7. Then after, You tap to apply option and choose hit OK Option to apply changes. 8. After that, you always find the changes in your device whenever. your computer or device will be creating a restore point automatically. Then after check you Error Status. It is found, try to another method it’s given it. Step 3: Reinstall Windows Operating System If your problem is not to be solved. firstly backup your device data in an external Device. Reinstall your Computer or Device. Then after Installed Drivers and Software. If your problem is not solved. you contact our Dell Support Assist not working Technical Support Number a certified technician can help you and find your eject problem, issue and solve. The certified technician solves problems in several minutes. 
Newer | Latest | Older
|
| « |
January 2020 |
» |
 |
| S |
M |
T |
W |
T |
F |
S |
|
|
|
1 |
2 |
3 |
4 |
| 5 |
6 |
7 |
8 |
9 |
10 |
11 |
| 12 |
13 |
14 |
15 |
16 |
17 |
18 |
| 19 |
20 |
21 |
22 |
23 |
24 |
25 |
| 26 |
27 |
28 |
29 |
30 |
31 |
|