|
TECHY SUPPORT BLOG
Monday, 24 February 2020
How to Remove Virus From PC
Virus Infection. You may be thinking it will never occur to you. Until it, Do not know what do in this situation. Until it, Do not know what do in this situation. How to Remove Virus from Mac? Maybe you take the help of a technician or you will try to remove the malware the PC by yourself. Maybe you will say this issue on a safety forum where some people look the common problem. Note: You have noticed your computer has started to slow down, pop-ups appear randomly, it crashed application or that unusual applications open automatically. See these signs can tell you. Your PC is infected with a virus. So, a virus-infected your computer or hostage your device. In this article, we will discuss all the step how to Remove Virus from Mac? you just need to follow the steps and easily remove malware from your computer and restart your computer to a functional stage. Step 1. Firstly, you take the backup your all important files and documents then you follow the next procedure to removing the virus infection. First, you conform to you have backup all your important documents and files. You can do saves important documents and files to cloud storage, USB sticks or external hard drives. Use this manual to superior back up your online data. You use an external source to store your data back up. You can perform online or manually or automatically online backup and we suggest using application backup tools. Step 2. Go to Your computer Safe Mode with Networking. Firstly, you unplug USB drives from your computer and then shut down. Restart your computer and press F8 key again and again until it goes your to the Safe Mode with Networking. 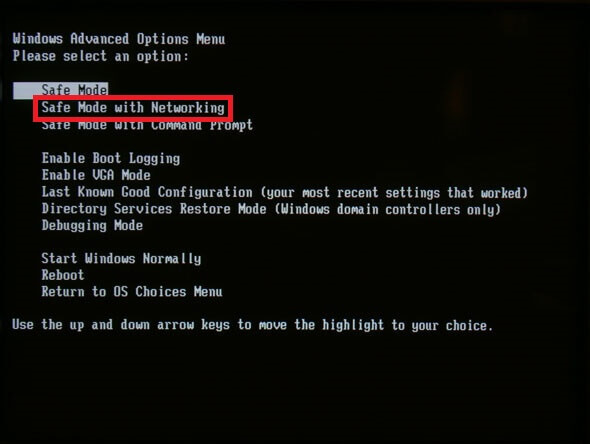
In this process, it will boot up your system only critical processes and prevent certain virus infections from starting up. If you are using Windows 10 or Windows 8, here we say to you how to goes to safe mode your computer. If you have an older version of Windows, as like Windows 7 or XP, follow given steps. Step 3. Remove your all temporary files. You need to be making simple your scanning process firstly you should remove all unwanted temporary files from your PC. Go to Windows Drive and right-click, as like C:/ or D:/ >> Properties >> Disk Cleanup. From the menu, select which files you want to remove. Step 4. How to remove Virus with an anti-virus tool. If you clean malware to your computer, you will require some specialized application to find and remove up the malware and virus. Here is a list of Software to remove virus your computer. 
If you want to know all the details about "How to Remove virus" please visit our website and flow the steps to solve the problem. If you stuck to do this "Remove Virus from Mac" please contact Customer Support. A technician available 24/7 available in the help of the customer.
Monday, 17 February 2020
How to Update a Garmin GPS?
Garmin map Application gives information about the correct location information GPS technology. It provides important the right ways with reliable traffic and roads information. Also, It exhibits navigation and gives the right ways to reach out to the destination point with Simplest. Without Update Garmin GPS, You will not able to all the latest services provided by the Garmin. Here, we are discussing the process to install the fresh Garmin update. For fastly help, you can also update from the help for a service provider or professional and get a fresh idea about how to Update Garmin GPS 
Why you update Garmin GPS? If you find the specific address of a location you might be getting the error. Occasionally, you are not satisfied with the navigation information and you away push with different issues. So, the simple way is to install the Garmin Application and if you do not know the procedure on how to Update Garmin GPS, then select a perfect service. Let's find what are them the critical problem that strikes Garmin Map Update. - Garmin GPS map startup issue.
- Garmin map touch screen does not respond.
- The GPS is locked on up constantly.
- Device updating issue Garmin map server error.
- The Garmin map launch issue after the installation.
- Map update download is very slow.
- The device navigation does not provide the correct information.
- Garmin GPS connection problem to a network server.
- Garmin GPS does not provide the right path and immediately stuck.
- GPS device settings issue and Garmin application compatibility problem.
Therefore, if you look at any of the similar problems, at the problem you need to modernize the Garmin device with the comfortable version, It is also important to update the Garmin Map Update you take the help of a technician to know the details on how to Update Garmin GPS. How to Update Garmin GPS? Choose for our credible services Some important point keeps in mind about helping you to update the GPS. Here, we discuss how to Garmin Map Update with ease. Download and Install the Garmin GPS System Firstly, Visit the Garmin official website and download the map system. After that, run the installer file and complete the installation procedure. But, it is not a simple task for a non-technical savvy person. So it needs to contact the experienced team to know how to update Garmin GPS and update the Garmin Nuvi simply way. 
How to Update the Garmin Map Device? If your device does not respond the proper way, So you need to update the Garmin device with the newest version. Firstly, you conform downloaded application that suitable with your device Windows Computer. Another thing you need to check enough space available in your device then install the latest version Garmin map. To know all the details how to Garmin Map Update, follow the given instruction below. So, launch the application and choose the Update section. Next, install the newest version and create the navigation easily. If you want to know all the details about "How to Update Garmin GPS" please visit our website and flow the steps to solve the problem. If you stuck to do this "Garmin Map Update" please contact Customer Support. A technician available 24/7 available in the help of the customer.
Saturday, 15 February 2020
How To Install Dropbox On Mac or Windows 10
In this article, we cover How to download and install dropbox on mac and Windows computer? OneDrive comes with Windows 10 but another most use wold wide cloud storage solutions are Dropbox. Dropbox is also a good application and comfortable with Windows 10 and Mac its allowing to enter your data and files, but it does not allow you to synchronize to your computer. If you want to sync, you first you need to install the desktop sync application on your Windows 10 and allowed to enter your computer files, but it does not allow you to synchronize them to your Computer. 
Dropbox application installation is complete. After that, you have something that resembles OneDrive. Here's you need to do. - Visit Dropbox.com and hit on "Download the application" see on the homepage. Next to Install the .exe file double click and run the Dropbox Installer and follow all-important instructions.
- File Explorer. Once you have done the installation after that you Dropbox sync application frequently use the sidebar in file explorer, as like any other folders on your computer, or OneDrive. Then you can examine everything.
- Access Dropbox preferences. You want to sync a folder click the Dropbox icon on the taskbar it's located on the bottom right corner. Then hit the setting icon in the upper right corner and choose "Preferences".
Select which files or folders to sync. Go to the Account tab and choose the option Selective Sync and click it. The overall list of your Dropbox files will now be in ahead of you. After that check the box next to sync to your PC. Next, you want to enter your Dropbox folders now just open up File Explorer and see the sidebar on the left side. Here only seeing you have appeared file and folder your sync file and folder choose to sync, so you do not panic looks a some empty. But, you have offline file and folder access available already. For Windows Computer this is possible the preferable way to access Dropbox on your PC. So smartphone and tablets do not have the more storage capacity that a Windows Computer will have, the Data Storage application is a too better way to go on those devices for accessing files and folders. Once you need How to Install Dropbox on Mac or Windows Computer? You do not have to panic about it. Next, move easily data and file across your devices, and care your device and care the background sync. 
Dropbox is a helpful way to store files and folder remotely in the cloud, it can be more much suitable if you using Windows 10 computer to install it. So you install the Dropbox sync application onto your Notebook and you can easily connect to your computer and access the hard drive to the help of File Explorer. If you want to know all the details about "How to Install Dropbox on mac" please visit our website and flow the steps to solve the problem. If you stuck to do this "download and install dropbox on mac" please contact Customer Support. A technician available 24/7 available in the help of the customer.
Friday, 14 February 2020
How to Remove Activate Windows Watermark
If you have lately bought a new Windows device or mode important update to the hardware in your material, so maybe your device shows the Active Windows 10 watermark on the lower right of your desktop. As this is just minor pain, but it's maybe something that you do not want to have to stare at you every time you turn on your computer. How to remove activate windows watermark The stable solution is also the easiest. If you have an already product key as like Windows 10, or further a valid key from Windows 7 or 8.1, then you follow the steps and enter the product key. - Go to Windows menu is located on your left bottom of your device screen and right-click.
- Next, click on Update & Security.
- Click on Activation.
It will fetch you to the Activation window, which will give the information you have already activated Windows. It also gives you links for both where to obtain your product key, as well as to the Microsoft Windows store if you required to buy a new one. If you have already an active key, then carry on next to the activation process: - Go to the Update product key.
- Next to hit on Change product key.
- After that Enter 25-digit product key.
In this process activate your copy of Windows 10, and the watermark will not be showing your computer. 
Try to use the Activation Troubleshooter Generally, Computer windows installation are connected to the motherboard, so if you have lately replaced yours it, then it's likely that your device will overthink it is freshly installed on a new Computer. If you have already attached your Microsoft Windows product key to your account, after that using the activation troubleshooter can solve the problem. Flow the given instruction step 1 to step 4 and activation window, next click on Troubleshoot. After that hit on I changed the hardware on this computer newly. Next, Log in to your Microsoft account, and you have done! your device Windows installation will be reactivated. How to buy a new copy of windows In these ways actually, you have own product key. you have a Windows valid product key to do the activate it. If you do not have, the good to go and buy and solve the problem in the future and solve the problem remove activate Windows watermark. If you want to buy, you try to visit Microsoft official website direct link and buy a valid windows activation key. Another way you might be able to get the lowest price found online or a retail store, Note you always try a reputable vendor. Another option you could try and save some bucks. buy an unused copy of Windows 8.1 or Windows 7, like older versions of Windows, are much lowest price than the most recent one. Then you next to try to activate Windows 10 use the key. If you want to know all the details about "Remove windows activate watermark" please visit our website and flow the steps to solve the problem. If you stuck to do this "remove activate windows watermark" please contact Customer Support. A technician available 24/7 available in the help of the customer.
Tuesday, 28 January 2020
How to Fix windows activation failed?
Microsoft First time introduced the Product Activation in the year in 2001 to Windows family. The activation product key is also to pairs your computer. It provides security and copies protection in addition to defining justification right, that protects the product channel from which the Application software got: OEM, Volume License, Retail, or Trial. In Windows 10, Microsoft has done huge declarations about product distribution. The most popular being that Windows 10 is free available Windows 7, 8/8.1 users for the first year. Anyway of this, activation of the product continues to exist a section of windows 10. In this description (Article), we discuss the activation and troubleshooting steps. 
You should know about things: If you have Windows 7 or Windows 8/8.1 product key, in this product key is not to solve the problem activation of Windows 10 because Windows 10 has a unique product key. In the Windows 10 have already a default keys and you do not need to enter any product key and not be prompted to enter one, and you have already activated Windows 7, Windows 8 or Windows 8.1 license or Windows 10 Preview build. If you do a single install on the once attempt, then you will have to be starting from an operated Windows 7 or Windows 8.x installation. Windows open and prompted to enter an activation key, Hit Do this and take it some days, Windows 10 will turn on automatically. Activation server’s force be flooded at the times as of the bulk of upgrades, so provide it more time if you get an issue report such as (0x8007000D, 0x8007007B, 0XC004E003 or 0x8007232b.) Windows 10 will lastly activate as lengthy as you improve using suitable ways. Do you know, you do not require to know Windows 10 product key; see Getting product activation key in Windows 10: Product Activation in Windows 10 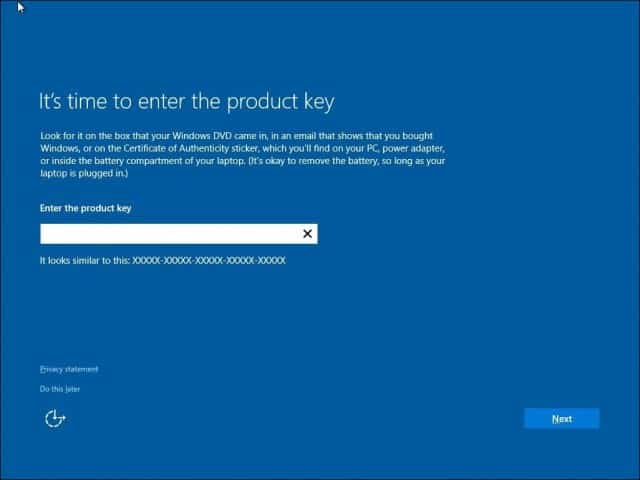
In the past Windows releases, as you installed an advance version of Windows: So you required to reinstall the advance version, you had once to reinstall the qualifying version from which you improved, reactivate it, then improve again and reactivate afresh. In Windows 10, this is no longer the matter. Once you are improved to Windows 10 and operated, after that, you can create a bootable copy on USB or DVD and You try to reinstall the Windows 10 without the requirement to reinstall the modifying version, and it will automatically reactivate. Windows 10 store the information in the Cloud Store and keeps a copy of Every Product Activation as like Windows 10 registers information and so on other product. Then you attempt to reinstall or fresh install the installation checks with Activation Server, find out the genuine installation ID and make the validation for your machine. Next When Installing Windows 10 Build 10240 Follow the given steps and solve the problem "Windows not activated". If you want to know about the other way, then go to our website and please read the full article. If you fail to do it then you can contact us a technical available 24/7 in customer help. In the help of "your windows is not genuine".
Monday, 27 January 2020
How to reinstall macOS
Fresh installation of the Mac OS may get your Mac running properly again. Again reinstalling macOS will issue solve any types of problem you have OS, but it is often overkilled. It's an improved choice if your computer operating system will not take extensive time, or you can not resolve the problem because it is system-level issues. It is also helpful if you have borked your establishment so imperfectly that you good to off to go back to square one. Then you are wary and lucky, you can alike reinstall macOS barring erasing your hard drive. 
Select the right Way to Reinstall macOS You firstly trying to reinstallation like should ever be reinstalled macOS sans erasing your boot drive. In this on the gone process that can be done macOS files replacing with known best versions, sparing your computer from what software problem was carrying a problem. In case your problem is not fixed, then you next to erase your boot drive and do a new reinstall. In case you can not perform to boot in recovery at all. Then you can just a bootable USB installer. How to Install macOS again using Recovery Mode The excellence technique for reinstalling macOS that say called recovery. This unique mode boots from a particular recovery on your boot drive, in these, creates at the time of installation. You are not able to change the partition you boot from. You want to change the macOS boots in the recovery partition, then you first unlock the boot partition to do changes. During the Recovery partition, you can free and do changes and modifications to your primary boot dividing, covering completely delete it or reinstall macOS. Next to boot into Recovery Mode, restart your computer. Your Mac shuts off and again the computer starts up you press hold down Command + R. Freeing you to see the Apple logo then release the keys or a progress wheel, or a password prompt. Note: If your computer needs a firmware password, you will require to enter it before you can finally boot into recovery mode. In this doing with Macs administered by a group with a mobile device control policy. If you not know to your firmware password and can not get it, then you have to prove it owns, Apple may be capable to unlock your device for you. How to Reinstall macOS without erasing anything If you are facing problem in macOS installation, then you do not wipe the disk completely and start over from scuff. In reality, macOS can act as a try to reinstall only the system files, and performing the change the system files as corrupted or damaged system files and, hopefully, give back your computer to a working state. Note: In this way is a default system for reinstalling macOS. It is also the first manner you should make after, it is the minimum destructive. Even after that, it not fix your problem, but it is not the last option. 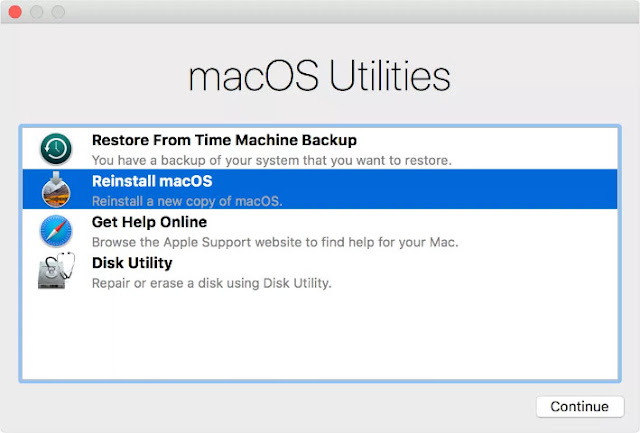
So, it’s try to recovery mode and choose to reinstall macOS in the list of macOS utilities app, certainly choose to Continue to induct the installation process. If you want to know about the other way, then go to our website and please read the full article. If you fail to do it then you can contact us a technical available 24/7 in customer help. In the help of Reinstall macOS.
Mac White Screen: How to solve your Mac that won't Turn On
If you required to use your Mac Computer, however, your Macbook Won't Boot? If your Mac book stuck on a white screen? In your progress not working your Mac book get stuck at the Apple logo? Mac book showing white screen it's maybe some functioning stop working, In this types of issue or error with coming out with your macOS operating system not loading some application properly. In this issue may be the various reason your Mac book was not booted and showing a white screen. So, Here given different tips you can try to solve it. In this article describes how to Resolve Mac Problems. 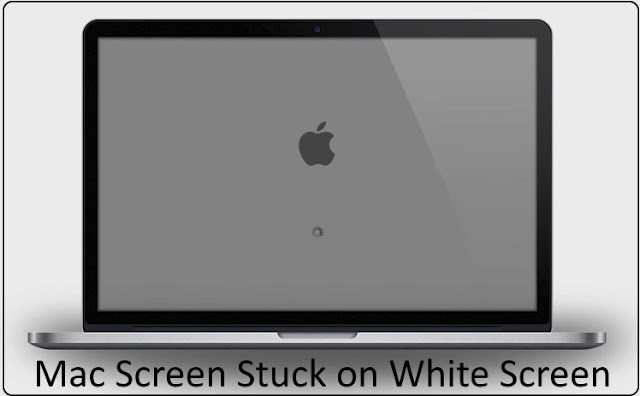
In this issue may work on Different Mac devices as like MacBook Pro, MacBook Air, iMac, Mac Pro, MacBook. So, Starting firstly you have been collecting all the important files and data copy. You collect the information and backup first before doing anything. Your Mac does not boot, so it is possible to collect the information and backup. In case of you taken backups already, skip these step. Also, you can use OS X Recovery to Copy data your Mac book. How to fix Mac White Screen Issue? Please examine to see, then you try all process your issue is also solved. Firstly you Disconnect all devices. Step 1: Press the power button hold it and shut down. So you disconnect all devices (USB devices, printers, scanner etc) and Reconnect keyboard mouse, your Mac. Then after try to restart your computer. If your computer starts without any problem, that means to one of the issues of your accessories reason this. Then you try to reconnect your peripheral devices and find the actual issue. Step 2: If you try to restart your Mac its not working properly, Then try to these steps. Then Try Safe Mode, after that your Mac does not turn on. Safe mode finds the diagnostic and solves the macOS issues. In these ways, Safe Mode is a useful solve the problem troubleshooting process. Here is showing how to begin your computer in safe mode: Try to Shut Down your Mac, wait at least 10 seconds. Restart your MacBook. And the quick, press and hold the Shift Key as your Mac restart. then you press the Shift key instantly after the starting sound earlier Apple logo appears. If you see the grey logo then release the key or login screen. Then try to login note login may be taken have some time. Be cool because it is a slower safe mode. If you start up your Mac, restart your Mac generally without pressing any keys. Don't press the Shift key when restarting. Step 3: macOS Recovery use and repair your startup disk try it. May be possible disk is corrupted, because we are doing. Please follow given below steps: 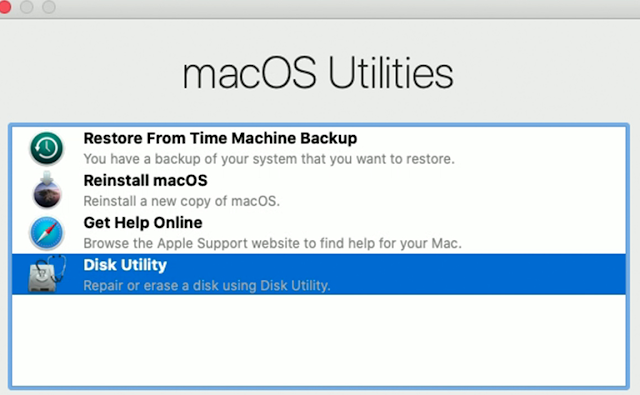
Restart your computer and press "option + R keys" instantly after the Apple logo appears. Your Computer starts you see the "macOS Utilities" window. Choose Disk Utility and Hit Continue. Choose your Startup disk. Hit the First Aid icon and then Hit the Run button. Disk Utility will now try to getting and solve any issues. After you were Done Reboot your Mac. Next to Resolve Mac Problems. If you want to know about the other way, Then go to our website and please read the full article. If you fail to do it then you can contact us a technical available 24/7 in customer help. In the help of fix Mac White Screen.
Mac White Screen: How to solve your Mac that won't Turn On
If you required to use your Mac Computer, however, your Macbook Won't Boot? If your Mac book stuck on a white screen? In your progress not working your Mac book get stuck at the Apple logo? Mac book showing white screen it's maybe some functioning stop working, In this types of issue or error with coming out with your macOS operating system not loading some application properly. In this issue may be the various reason your Mac book was not booted and showing a white screen. So, Here given different tips you can try to solve it. In this article describes how to Resolve Mac Problems.
In this issue may work on Different Mac devices as like MacBook Pro, MacBook Air, iMac, Mac Pro, MacBook. So, Starting firstly you have been collecting all the important files and data copy. You collect the information and backup first before doing anything. Your Mac does not boot, so it is possible to collect the information and backup. In case of you taken backups already, skip these step. Also, you can use OS X Recovery to Copy data your Mac book. How to fix Mac White Screen Issue? Please examine to see, then you try all process your issue is also solved. Firstly you Disconnect all devices. Step 1: Press the power button hold it and shut down. So you disconnect all devices (USB devices, printers, scanner etc) and Reconnect keyboard mouse, your Mac. Then after try to restart your computer. If your computer starts without any problem, that means to one of the issues of your accessories reason this. Then you try to reconnect your peripheral devices and find the actual issue. Step 2: If you try to restart your Mac its not working properly, Then try to these steps. Then Try Safe Mode, after that your Mac does not turn on. Safe mode finds the diagnostic and solves the macOS issues. In these ways, Safe Mode is a useful solve the problem troubleshooting process. Here is showing how to begin your computer in safe mode: Try to Shut Down your Mac, wait at least 10 seconds. Restart your MacBook. And the quick, press and hold the Shift Key as your Mac restart. then you press the Shift key instantly after the starting sound earlier Apple logo appears. If you see the grey logo then release the key or login screen. Then try to login note login may be taken have some time. Be cool because it is a slower safe mode. If you start up your Mac, restart your Mac generally without pressing any keys. Don't press the Shift key when restarting. Step 3: macOS Recovery use and repair your startup disk try it. May be possible disk is corrupted, because we are doing. Please follow given below steps:
Restart your computer and press "option + R keys" instantly after the Apple logo appears. Your Computer starts you see the "macOS Utilities" window. Choose Disk Utility and Hit Continue. Choose your Startup disk. Hit the First Aid icon and then Hit the Run button. Disk Utility will now try to getting and solve any issues. After you were Done Reboot your Mac. Next to Resolve Mac Problems. If you want to know about the other way, Then go to our website and please read the full article. If you fail to do it then you can contact us a technical available 24/7 in customer help. In the help of fix Mac White Screen.
Tuesday, 21 January 2020
How to fix Windows Update problems on Windows 10
If a windows update is stopped, here we discuss how to solve Windows update problems. Operating system updates are not a good thing but it is a necessary evil but is required, like car MOTs and taxes they can be a real task, but they're necessary for a peaceful and happy life. You force not care for Windows updates, but they lay you protected, in the general ways to smoothly as well as your Operating System running, and squash nasty bugs. However, It's running smoothly, but these types of updates do not always to do that. In the latest version of Windows, Microsoft has done one best to built the process as pain-free as easy, but lots of hardware and software are some types of unexpected errors will be become out. But if it does, do not panic we discuss here the solutions of in these types of problem. Read this article to How to fix Windows 10 Won't Update. 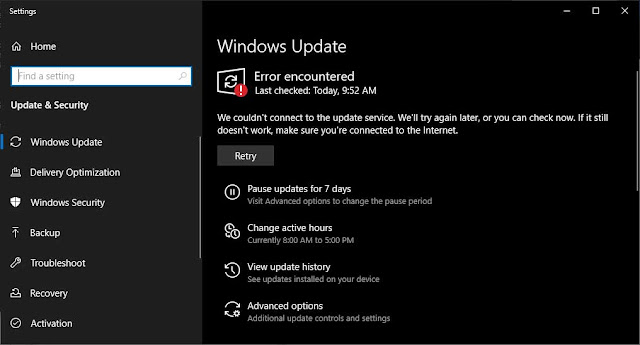
How to solve Windows update problems - First, confirm your updates are stuck.
- Next, turn it off and try on again.
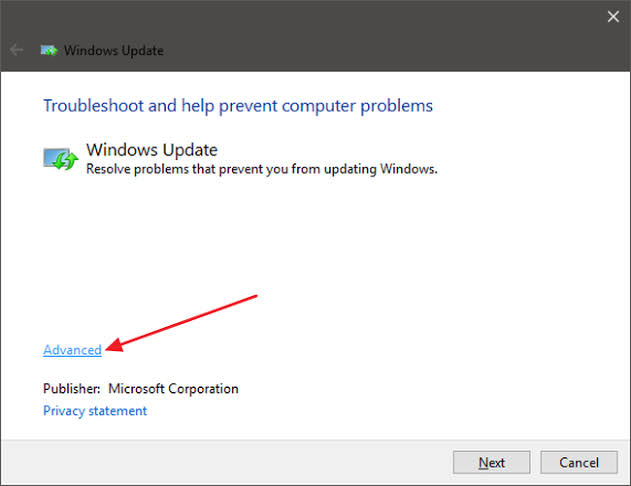
- Check the Windows Update availabilities.
- Next to run Microsofts troubleshooter application.
- Then after, launch the Windows in Safe Mode.
- Then go away to the time with System Restore.
- Remove the Windows Updates file cache himself.
- Next, Fully scan your system.
- Then you run and reset your full Windows.
- First, confirm your updates are stuck.
We are discussing to a lot of ground hare for respective versions of Windows and different types of "stuck" outline, then you have to flow these steps to modify your case and software. First, you conform to make is that check with updates that are not stuck can cause a give of problems, so you stuck. If your patience and got the time, you will be waiting a couple of hours, Mostly with the slower computers. It may appear real wards, but you do not want to start tempering with these fundamental processes. Unless you have to. - Next, turn it off and try on again.
If you know why "you try again to turning it off and on again" It may be an IT Support cliche? Since it so much works. But it is not a magic trick - it just clears out your computer's temp memory its include some stalled files or procedure, then start the computer again and everything on the system. If your computer updates are stuck in the backdrop as you still have a way into Windows, then you restart normally; In case, of your computer, stuck on the time of load please hold the power button and reset again. This can make a problem itself, so you conform updates are not progressing at all. - Check the Windows Update availabilities.
In Windows 10 go to start and next to launch the setting application and find the windows update the page if you found the anything wrong then you collect the wrong information. Sometimes you get a message then you will try again the update at a different time. - Next to run Microsofts troubleshooter application.
If you want to know about the other way, Then go to our website and please read the full article. If you fail to do it then you can contact us a technical available 24/4 in customer help. In the help of Windows 10 Won't Update.
Monday, 20 January 2020
How to Create Norton Online Backup
Norton Backup tool also provides the security of your digital photo and important data and files safe and secure online backup. In case of your computer hard drive crashes, Norton Backup tool provides the recover with your files or other data loss problem, easily and fastly. Norton Online Backup provides the protection automatically your files, photos music and different important details data or files from loss. 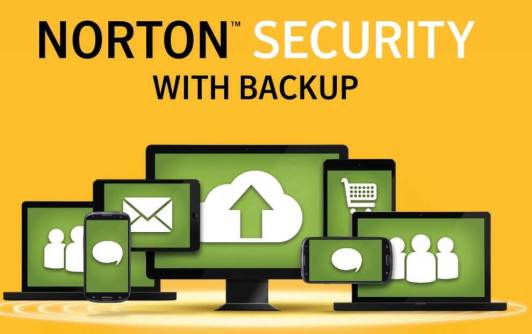
Norton Online Backup tool ( 30 days free trial, $50) is the best software in the online backup in the world You use it and configure online. Your computer system is a client to interface Norton Online backup, but simply the unique thing may do with it is invoke the online interface. That can use your local software and schedule the online backup of your computer data to choose files and schedule backups. Norton Online Backup tool provides Create backup online interface is completely good to look, and strong. Norton Online Backup it selects the files automatically, selects files bases on some set of rules other locations, or just add it one by one. My main objective is that scheduling, as simple to set, is banned to daily, weekly, or monthly settings. These ways you can not find the same ad hoc constant data protection that you can with Mozy, Fabric and other. Hence, Norton Online Backup is simply comfortable for less volatile data sets and also backups of off-hour. Norton Backup tool will take the backup open files, and it did so many times for me, but it failed once with Outlook file, then after came back up successfully. The log said and that can not be backed up as" …unduly likely because of few other programs were using it at the time." The Norton is examining it, but it was not clear at the time of this posted review. It will easily XP installation as well as uses. Norton Online Backup single Version also provides the Create backup online up to 5 GB data, and up to Five PCs total. There are further PCs than several services allow, and at $50 an Annual cost per GB is wholly competitive. A Norton Online Backup account is also charged a bundled free with Symantec's Norton 360 security suite. You just get the 2 GB storage with the version of 360, costs of $60 and the 25 GB storage with the Premier version of 360, cost of $80. You easily access your back-up files from everywhere through the web access part of the online interface. However, no option is available in case of the internet is down and no option to duplicate the backup locally your data. But, as online you will be e-mail links to your data then you will be sharing them with others. As a help to Norton 360, Norton Backup tool is something you get the benefits of. As for standalone it,s too competitive there is both feature and price-wise. 
In this way, you need to Norton Backup tool, Create backup online Please visit our website to read the full article, If you need any further assistance, you can contact us a technical is available 24/7. In the help of Create backup online.
Newer | Latest | Older
|
| « |
February 2020 |
» |
 |
| S |
M |
T |
W |
T |
F |
S |
|
|
|
|
|
|
1 |
| 2 |
3 |
4 |
5 |
6 |
7 |
8 |
| 9 |
10 |
11 |
12 |
13 |
14 |
15 |
| 16 |
17 |
18 |
19 |
20 |
21 |
22 |
| 23 |
24 |
25 |
26 |
27 |
28 |
29 |
|